
Last updated on July 26th, 2023 at 07:13 am
Wearing good cloth can sharpen our impression to others. But have you ever wondered what image it might create if you wear the cloth in an inappropriate way? Well, it will certainly do more damage than boosting the impression.
Similarly, your roller banner or roll-up banner is a crucial part of your advertisement strategy. The task of a roller banner is to convey a message to the desired audience (in most cases the passerby) in the most effective and convenient way. This “effectiveness” of your roller banner largely depends on how you set it up in front of your potential customer or clients – just like the way you would like to wear your cloth in an appropriate way to mark an impression.
There is no doubt that a well-set-up roller banner creates a positive impression on the customers and ultimately increases the sales and revenue of your organization. It is a cost-effective option compared to other forms of advertising. Even it beats the cost of billboards, leaflets, or other print or TV ads! Versatile, portable, and easy to set up, a roller banner can be used multiple times.
On the other hand, a poor set-up roller banner does not only look unprofessional but can also call havoc by collapsing or toppling over in the wind.
So, how to set up the roller banner? Well, it’s a short yet tricky process to deal with. It requires careful undressing of the roller banner, meticulous maneuver to set up the pole at the right height and tension, and the art of rolling it back safely.
Check them out in detail below to get the ultimate impact on your roller banner.
Step 1: Unpacking Your Roller Banner
- Once you have your roller banner or roll-up banner delivered from the roller banner printing shop, it’s time to set it up. Like a regular sensitive item, gently unpack your roller banner so that you don’t break it. Roller banners are typically made of lightweight aluminum alloy, which is very vulnerable if handled carelessly.
- It’s wise to check if you have all the components boxed inside the package. A standard roller banner pack should include a banner that demonstrates the message, a telescopic or segmented pole to connect to the base and holds up the banner, a base that keeps the banner upright and stable, and a carry case or bag to store and transport the banner and its components.
- You should receive a set of guideline manuals for smooth installation. Note here, some of the roller banners may also come with light, selves, or graphic panels depending on the models you have ordered.
- After making sure you have everything as promised, start reading the instruction to get yourself familiar with the installation process.
Important Tips: It would be wise to inspect the banner for any damage, creases, or wrinkles. Sometimes things get damaged during transportation. If you find any wrinkles in the banner, smooth it out with your hands or cloth before inserting it on the pole.
Step 2: Assembling the Pole and Base
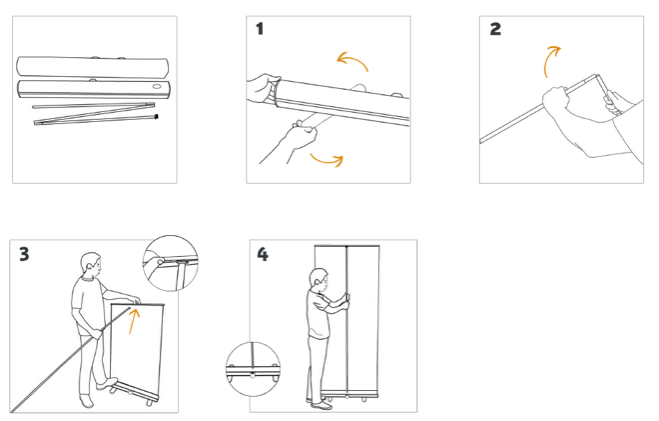
- After you have unpacked the roller banner from the box, it’s time to assemble the pole and base in an appropriate manner to get the perfect result. To do so, simply start by removing the banner from the padded bag.
- Identify the parts. Match the items mentions in the instruction manual provided by the manufacturer. With a standard roller banner package, you should find a base, a pole, and some other connector pieces.
- If the stability feet of the banner is already screwed, you just need to twist them the other way to make the base sit on it. Screw it if it comes separately with your roller banner.
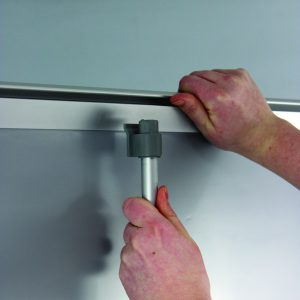
- Now it’s time to connect the pieces of the pole together. In most cases, they do not come assembled. All you need to do is gently slot the sections of the support pole together. There should be three sections in a pole.
- Place the base on a flat surface and put the support pole into the hole on the back of the base. Make sure the pole is inserted firmly. Don’t worry if it wobbles a bit, you are yet to attach the banner on the other side of the pole, which will eventually establish the tension.
- In most cases, you will be able to lock the pole to the base by simply twisting it clockwise. Twist anticlockwise to unlock.
Important Tips: Try to assemble the roller banner on a flat surface. Using a level will be highly appreciated. This will help ensure stability, accurate alignment, and smooth fittings. Also, do not put excessive force while assembling the components. This is not rocket science. Read the manual again if you have any confusion regarding how to assemble a roller banner.
Step 3: Attaching the Banner
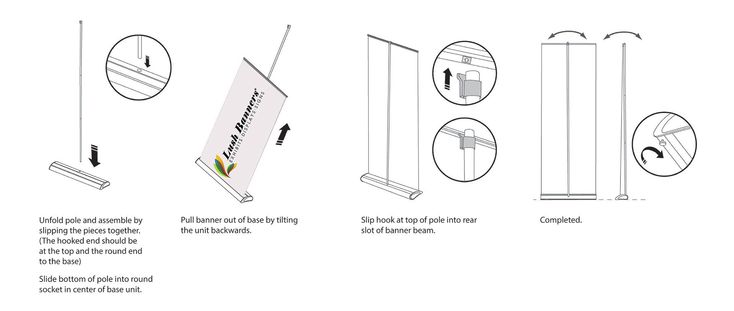
- With the base and pole of the roller banner secured in place, it’s time to do the easiest task – attaching the banner to the stand.
- Make sure you are standing behind the banner. The printed banner graphic should be facing away from you.
- Locate the header rail and gently pull the graphic or the banner from the base using the header rail all the way up to the top of the pole.
- While pulling the banner graphic up, make sure you tilt the banner towards you (not more than 15°) so that it easily hooks up with the pole top.
- As you continue to extend the graphic, make sure you tilt the banner back towards you in order to hook the graphic onto the top of the support pole.
- Secure the top rail cup onto the pole and set the banner down.
- That’s it! Your roller banner should be securely in place now.
Important Tips: After attaching the top rail cup onto the pole, gently pull the banner down holding it at the middle of the graphic to make sure it’s secured tightly in place. This gentle pull will create tension and ensure that it’s straight and tight in place.
You can also check this video to get a first-hand idea about the installation – Setting up a telescopic roller banner.
Step 4: Adjusting the Height and Tension
- To adjust the height of the roller banner you need to use the pole to get your desired length.
- In a modern roller banner, you need to adjust the length of the pole by twisting it anticlockwise.
- Use an inch of tape to measure the length of the graphic banner and set the pole to the exact length using the locking mechanism.
- The tension of the banner depends on the difference in the measurement of your banner and the length of the pole. If the pole length is greater than the banner, the tension will increase.
- Other than adjusting the pole of the banner, you may also find a tension adjustment screw or knob located at the base. Use the knob gently to create the desired tension.
- Pull the banner down to check if it’s in perfect tension.
Important Tips: The most desirable tension of a roller banner should be very subtle, neither too loose nor too tight. Too loose tension would make the banner look very clumsy and unprofessional. On the other hand, very tight tension could lead to pole break or graphic tearing.
Fixing a roller banner that has lost its tension
Over time, the tension of the roller banner tends to fall as the spring of the banner wears out. So, you may want to know to fix a roller banner that’s not providing the right tension. Well FYI, there should be a pin at the side of the base of the roller banner by which you can reset the tension.
You can simply fix the roller banner by following these steps –
- Remove the end caps located at the side of the base of your roller banner. You need a screwdriver and pliers to perform the maneuver.
- Once the end claps are opened, you will find screws holding the cover.
- Carefully remove the covers and you will find the banner roller inside
- Roll up the tension core slowly using the spring pin to reach your desired tension.
- Close the covers by bolting the screws. Do not put excessive force.
Check out this video on how to fix a roller banner that has lost its tension.
Step 5: Positioning Your Roller Banner for Maximum Impact
Once you have your roller banner ready to roll, it’s time to find the exact spot and way to demonstrate the message. A roller banner maximizes the impact when you set it up in a crowded place in front of the passerby.
- Take the entrance to your office, the hallway, near the reception booth, or a stall into consideration while positioning your roller banner. These places are best for maximum visibility.
- Avoiding cluttered space is mandatory while you position your roller banner. Your roller banner should stand out from other objects around it therefore choosing an uncluttered space is always impacting. Avoid placing it near a TV screen or other digital banners.
- Do not place the roller banner at a level where your audience might find it hard to read out the massage. Keep the center of the roller banner at an eye level for the audience’s convenience.
Important Tips: The use of a spotlight on your roller banner can set it apart from other advertising. Choosing colourful graphics on the banner will certainly attract the audience better than a pale-looking banner.
Preventing a roller banner from toppling over
You may want to know how to stop roller banner from toppling over. Well, here is the trick –
- Place it in a place where the wind is not significant
- Keep a safe distance from the passerby so that they don’t collide with it. Using flower tubs is the best option here.
- Use adhesive tape to secure the base of the roller banner on the floor
Step 6: Take Down and Store Your Roller Banner
- A roller banner is a portable thing. So, once the adverting session is over, you should take it down and store it properly for future use. Start by removing any additional materials such as lights, attachments, flowers, or pieces of paper from the banner.
- Wipe it with a soft towel to remove existing dust. Do not use water or chemicals.
- Retract the banner by unhooking it from the top of the pole and gently roll it down towards the base.
- Remove the pole and fold it accordingly.
- Use a protective case or bag and store it in a dry place.
Important Tips: If you have multiple roller banners, label them before storing them in the case for quick identification.
The Final Verdict
Look around, you will hardly find a marketing option that offers better ease of use than a roller banner. It’s also cost-efficient, durable, and versatile to make an impression straight away.
Keep patience while setting up your roller banner, especially while rolling the graphic up and down for the perfect tension. And finally, spot the brightest place to position your roller banner so that it flourishes and yields the maximum impact!
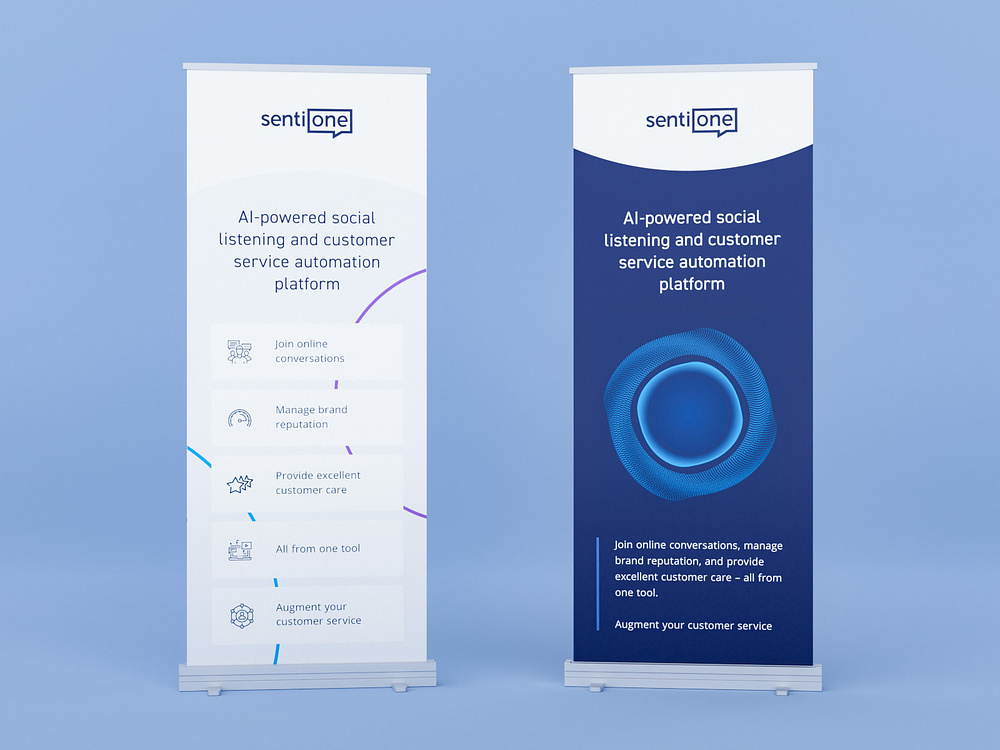
Best Personalized Roller Banner on Quickest Delivery: Get Yours Now!
With us, you’re guaranteed to get the most impactful custom roller banners that are great for repeated exhibitions. Thanks to our versatile design team, we know how to make a roller banner stand out with improved engagement techniques. Our roller banners are extremely sturdy and made of fade-resistant inks, which ensures your banner is built to last!
Get yours deliver to your doorstep at the quickest time possible. For more information on any of our products, check out our printing collections here, or Contact us to make any inquiries. Cheers!

Hi! I’m Jon Tabner, I am a Graphic Designer and Marketing Executive in profession. Exploring new things, innovation and designing is my passion. Now working as head of Graphic Designing & Marketing Executive team at Print In London and currently I am based in London. I love using my design knowledge to inspire small businesses to think outside the box when designing their print.